> ## Documentation Index
> Fetch the complete documentation index at: https://docs.converse.vitxi.ai/llms.txt
> Use this file to discover all available pages before exploring further.
# WhatsApp Chatbot
> This page contains the information on how can you create the WhatsApp chatbot for your business.
Here is the process to create the WhatsApp Bot using the Converse's Automated onboarding.
This document will guide you through the step-by-step process of creating the Converse WhatsApp Bot using the WhatsApp Business Cloud API. Following these instructions, you can set up your WhatsApp Bot and integrate it with the Converse platform.
## **Step 1: Check for Pre-requisites**
Before you begin, ensure you have the necessary prerequisites in place, such as access to the Converse platform, WhatsApp number, etc.
**Pre-requisites**
Before you start creating the WhatsApp bot, Make sure that you have
* A phone number that is
* Active & capable of receiving SMS.
* Not registered on WhatsApp or WA Business App.
* Registered legal business
* An active website with a valid privacy policy
* Business use case compliant with [WhatsApp](https://www.whatsapp.com/legal/commerce-policy) and [Meta commerce policy](https://www.facebook.com/policies_center/commerce/).
* A valid payment method (Debit or Credit card) capable of making international payments to Meta for conversation charges.
* GSTIN Number, Only if the business is registered in India.
If you have all of the above checked, You are good to start with WhatsApp Cloud API Bot.
Please note that a single mobile number can only be utilized on one of the WhatsApp services at a given time, namely WhatsApp, WA Business, or WhatsApp Business API. If you wish to use your existing number, you must remove your account from one service before using it on another.
### **Step 2: Create a WhatsApp bot & go through the WhatsApp Automated onboarding process**
#### **2.1 Register your bot on Converse**
1. Login to your Converse Portal and Click the "Create Bot" button on the top right.
2. Select "WhatsApp" as the platform on the next page.
Choose Platform
3. Provide the required details and follow the bot creation process.
 4. Scan the QR Code and initiate a WhatsApp message to create the demo bot 1st. Scan or Send Confirmation message
 5. Upon successful verification, Click "Connect to your WhatsApp number" to start the Automated onboarding.
 #### **2.2 Complete Meta Automated onboarding**
1. Select all the pre-requisite and click "Proceed"
#### **2.2 Complete Meta Automated onboarding**
1. Select all the pre-requisite and click "Proceed"
 2. Choose Automated or Manual onboarding. In this document, We will talking about Automated onboard.
3. It will open up a new pop-up window where you have to complete the Meta onboarding.
Please make sure that you have not blocked the pop-up window in your browser, If yes, Please enable the same.
4. Upon successful completion, Your bot will be connected to WhatsApp. But as a last step, You have to update your payment method.
### **Step 3: Update Payment Method to WhatsApp**
In the Business Manager, update the payment method for your WhatsApp Business Cloud API account to enable seamless transaction processing.
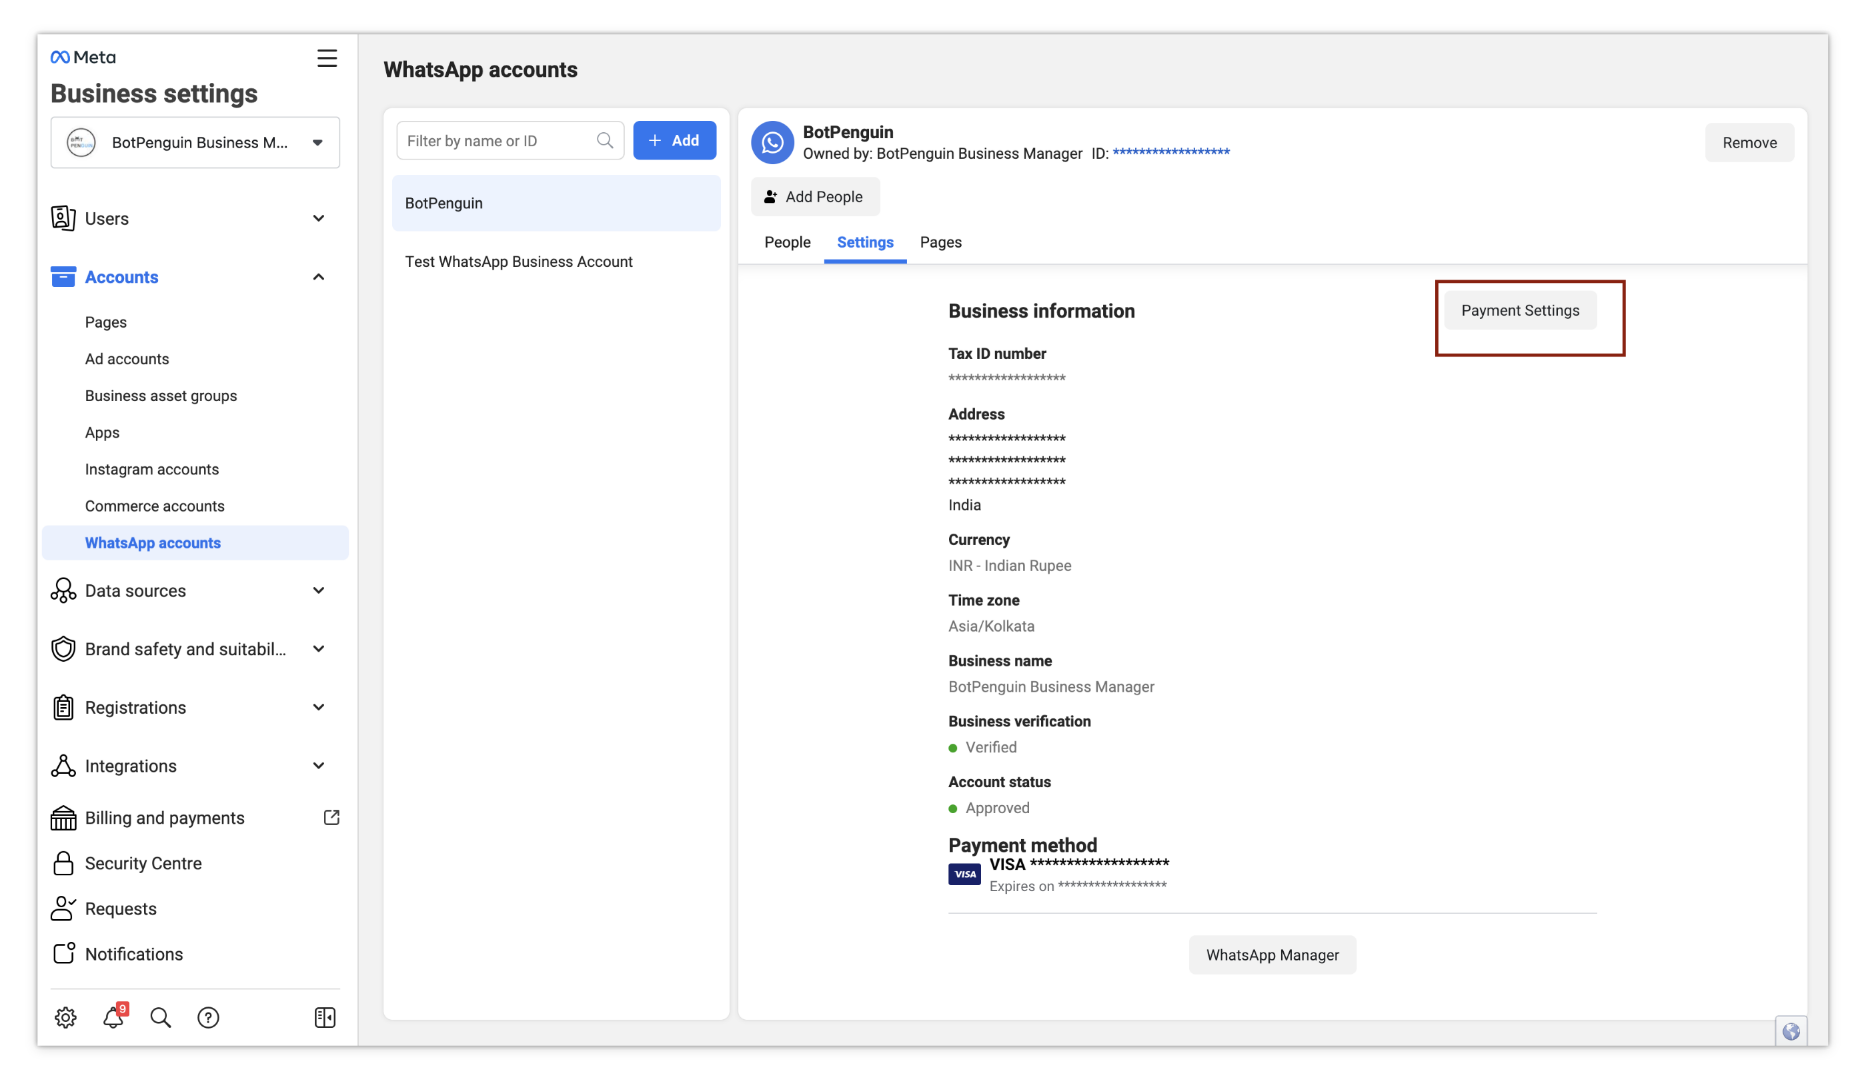
**3.1 Access WhatsApp Account Settings**
In the "Meta Business Manager," locate and click on the "Payment Setting" button for your WhatsApp Account.
2. Choose Automated or Manual onboarding. In this document, We will talking about Automated onboard.
3. It will open up a new pop-up window where you have to complete the Meta onboarding.
Please make sure that you have not blocked the pop-up window in your browser, If yes, Please enable the same.
4. Upon successful completion, Your bot will be connected to WhatsApp. But as a last step, You have to update your payment method.
### **Step 3: Update Payment Method to WhatsApp**
In the Business Manager, update the payment method for your WhatsApp Business Cloud API account to enable seamless transaction processing.
**3.1 Access WhatsApp Account Settings**
In the "Meta Business Manager," locate and click on the "Payment Setting" button for your WhatsApp Account.
 **3.2 Navigate to Billing and Payments Page**
On the "Billing and Payments" page, click on the "Add Payment Method" option to add a new payment method.
**3.2 Navigate to Billing and Payments Page**
On the "Billing and Payments" page, click on the "Add Payment Method" option to add a new payment method.
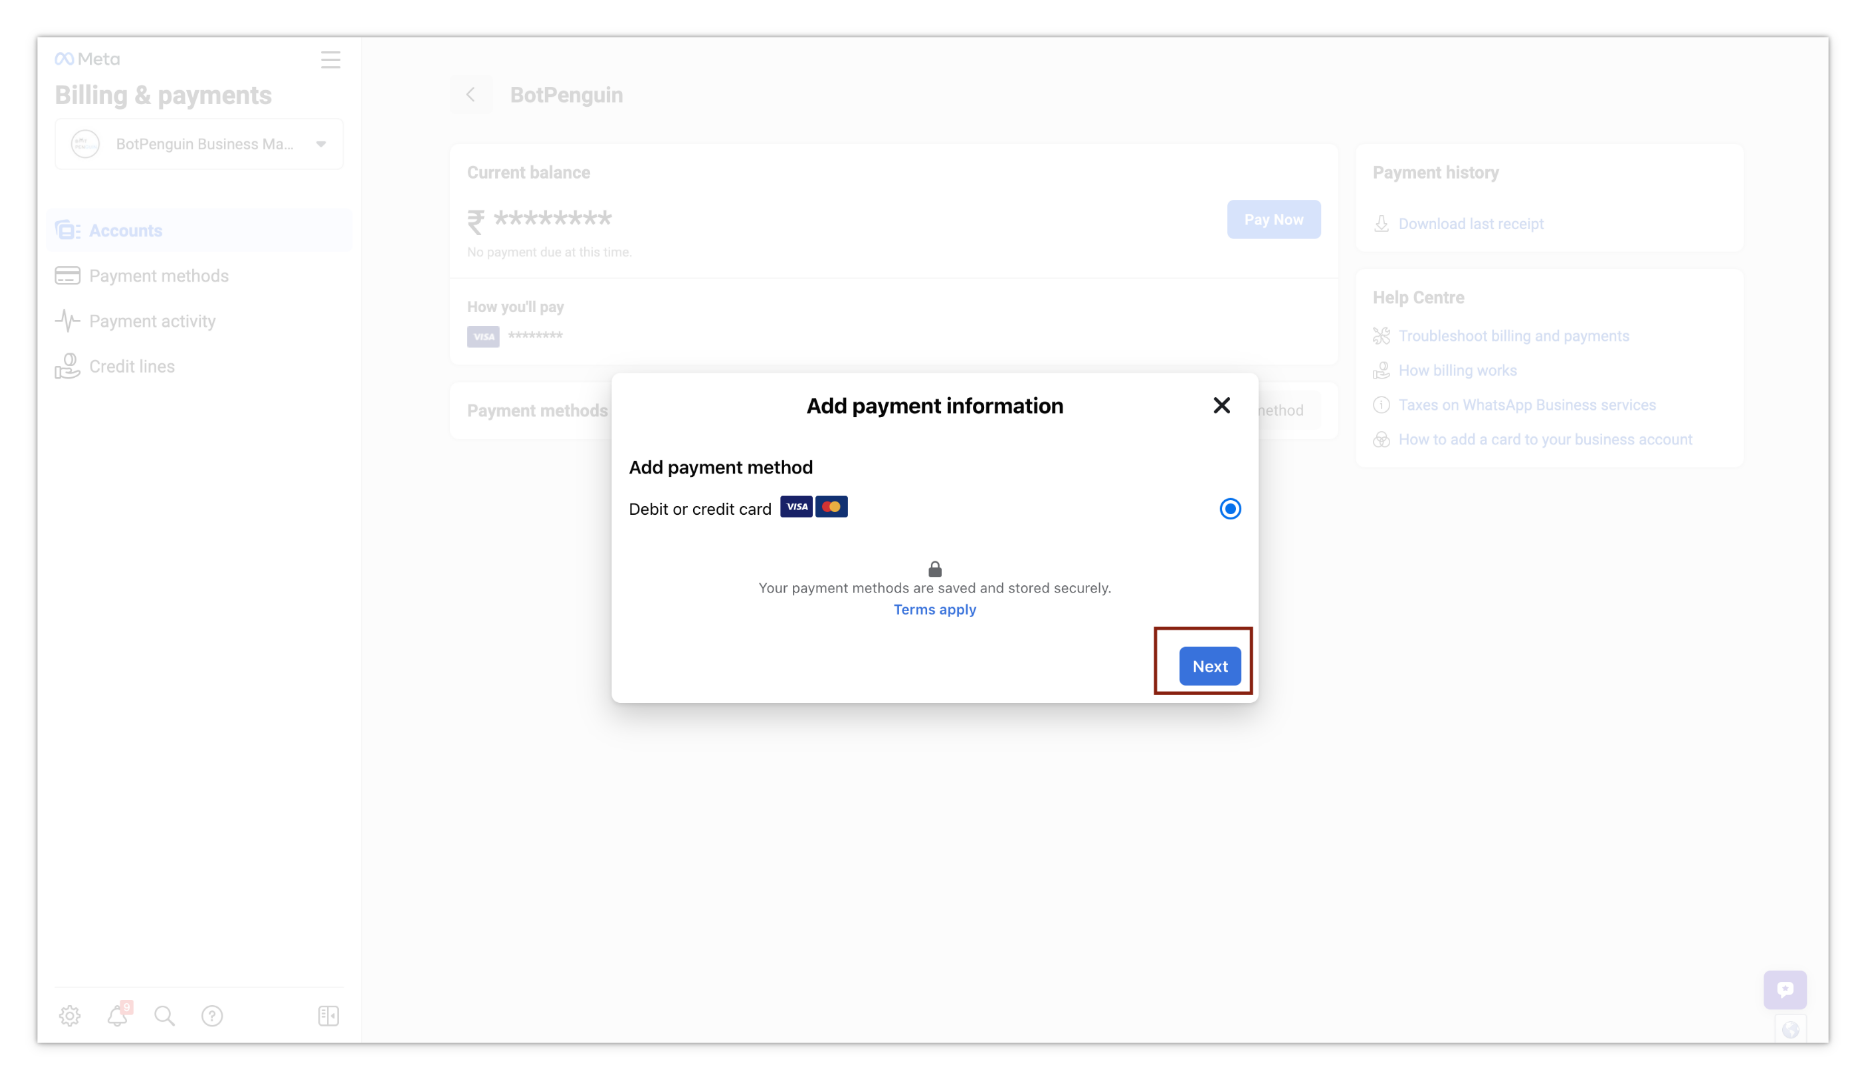 **3.3 Select Payment Method Type**
Choose the payment method type that you want to use for your WhatsApp account.
Select Payment Method Type
**3.3 Select Payment Method Type**
Choose the payment method type that you want to use for your WhatsApp account.
Select Payment Method Type
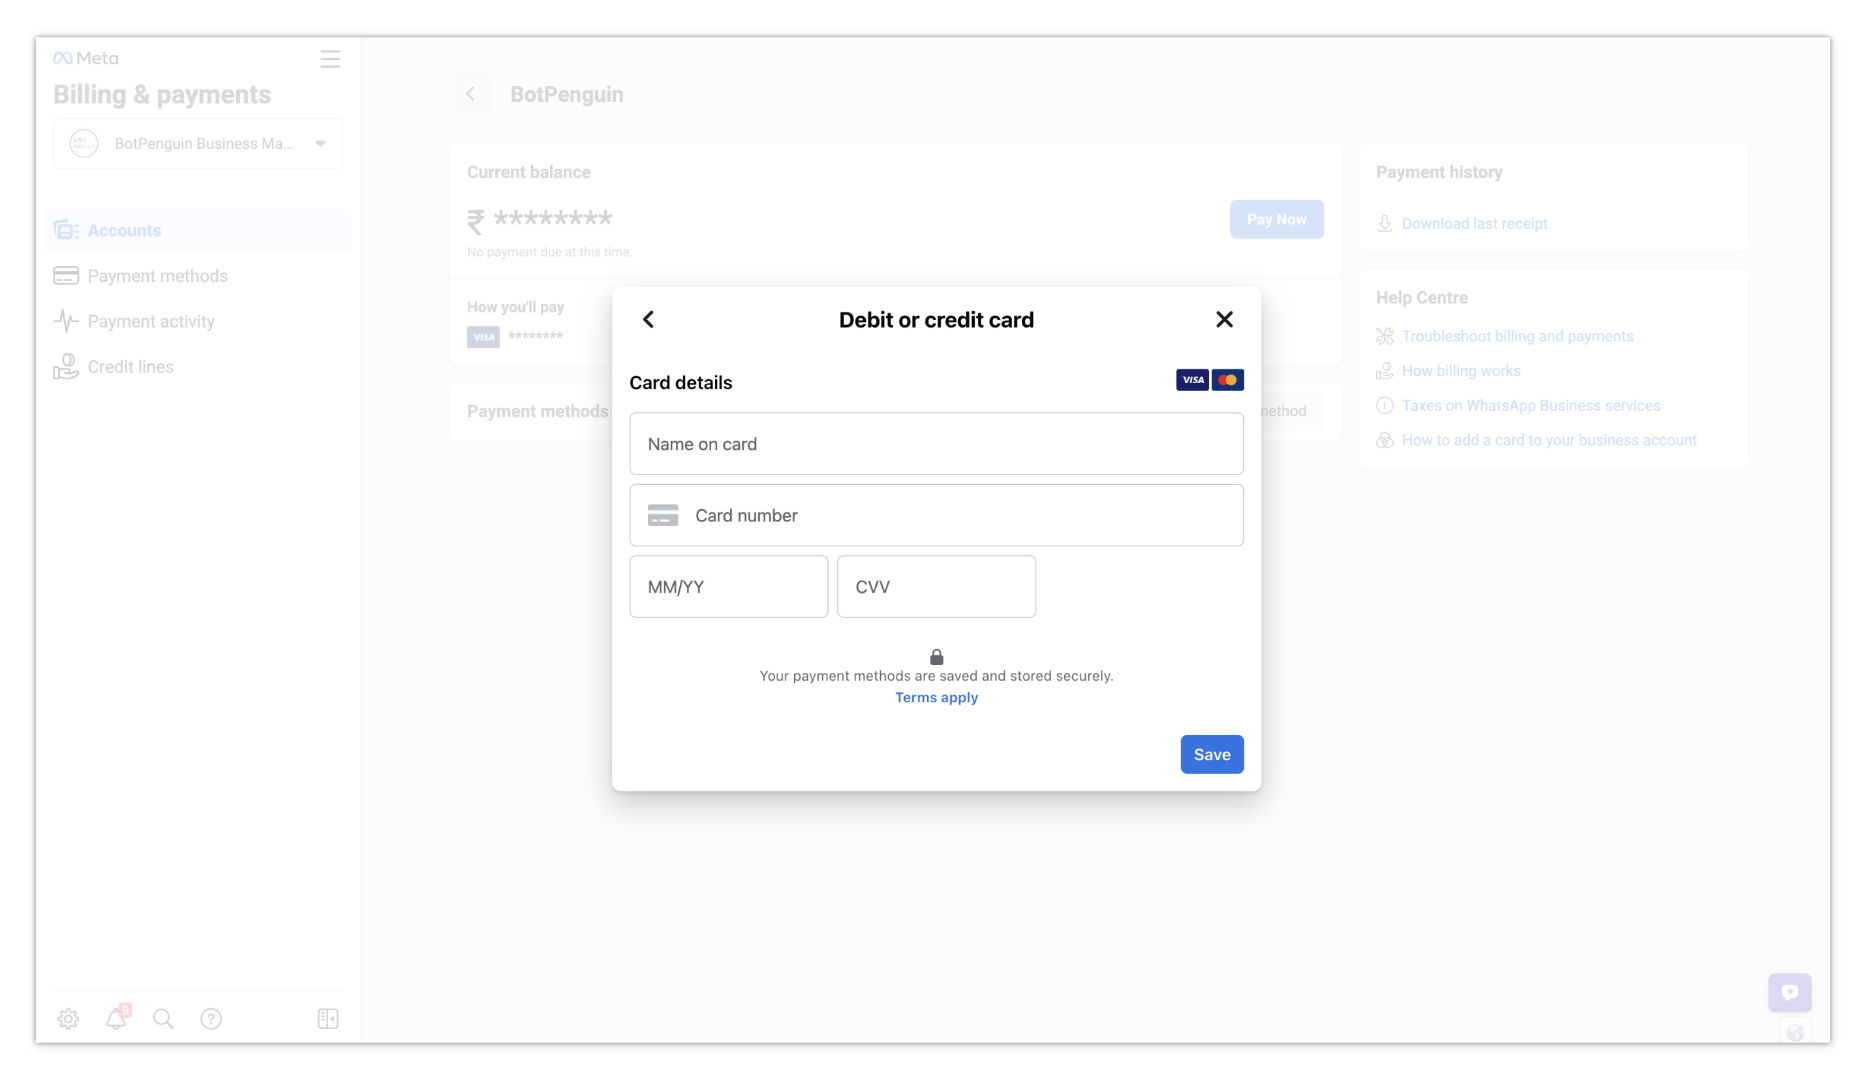 **3.4 Enter Payment Details**
Enter the necessary payment details based on the selected payment method.
Enter Payment Details
**3.4 Enter Payment Details**
Enter the necessary payment details based on the selected payment method.
Enter Payment Details
 **3.5 Verify Payment Method**
Once you have entered the payment details, proceed with the verification process.
**3.6 Update Business Information**
1. After successful verification, make any necessary updates to your business information.
2. You have successfully updated the payment method on your WhatsApp account.
Congratulations! You have successfully created the Converse WhatsApp Bot using the WhatsApp Business Cloud API and integrated it with the Converse platform. Your WhatsApp Bot is now ready to interact with users and provide automated responses.
Please note that specific steps and requirements may vary based on updates and changes in the Converse and WhatsApp Business Cloud API platforms. If you encounter any difficulties during the process or have further questions, please refer to the official documentation of Converse and WhatsApp Business Cloud API, or contact their support teams for assistance.
**3.5 Verify Payment Method**
Once you have entered the payment details, proceed with the verification process.
**3.6 Update Business Information**
1. After successful verification, make any necessary updates to your business information.
2. You have successfully updated the payment method on your WhatsApp account.
Congratulations! You have successfully created the Converse WhatsApp Bot using the WhatsApp Business Cloud API and integrated it with the Converse platform. Your WhatsApp Bot is now ready to interact with users and provide automated responses.
Please note that specific steps and requirements may vary based on updates and changes in the Converse and WhatsApp Business Cloud API platforms. If you encounter any difficulties during the process or have further questions, please refer to the official documentation of Converse and WhatsApp Business Cloud API, or contact their support teams for assistance.